Arduino Bluetooth on Ubuntu
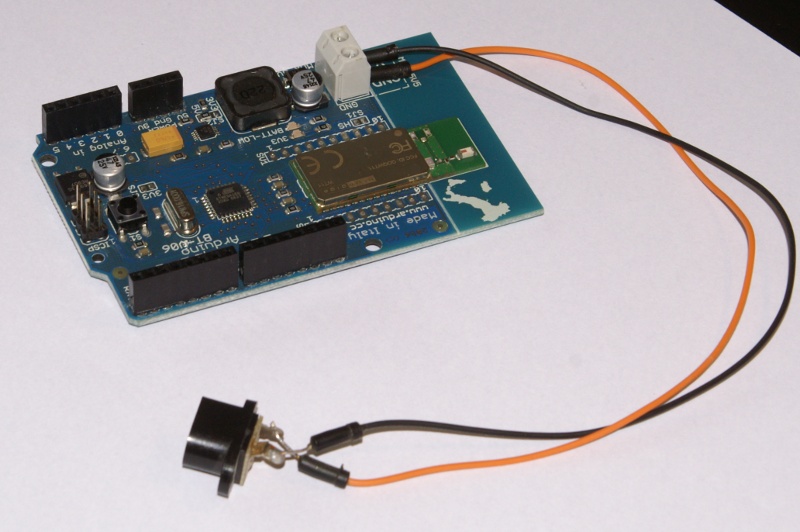
Arduino Bluetooth – Arduino without USB port, with Bluetooth module instead. Ideal solution if wireless communication with Arduino is needed.
At first – some differences to an ordinary Arduino Duemilanove. Arduino BT is based on ATmega168, so we have a little less memory at disposal. There is no USB port, so we have to power the board on our own.
If we’re talking about power – Arduino BT is vulnerable to supply voltage polarity, so connect ground and Vcc to the board with attention! What’s more, maximum supply voltage is only 5,5V! Fortunately, thanks to DC/DC converter, the minimal voltage is only 1.2V.
Because there is no USB port, the programming is also performed through Bluetooth. A short instruction how to do it – Ubuntu 9.10.
I didn’t utilized Ubuntu GUI to configure the connection, probably it also will work ;)
At first (of course after turning Arduino BT on) we search for available devices:
$ hcitool scan
Scanning ...
	00:07:80:91:30:09	ARDUINOBT
Here is the found module. 00:07:80:91:30:09 – it’s MAC address of the device and of course it’s different for each device. It should be replaced with the proper number of your Arduino everywhere below.
Now we are connecting to the module:
$ sudo hcitool cc 00:07:80:91:30:09
$ sudo hcitool auth 00:07:80:91:30:09
Possibly it will ask you for PIN – default is 12345.
We need informations about this device:
$ sdptool browse 00:07:80:91:30:09
Browsing 00:07:80:91:30:09 ...
Service Name: Bluetooth Serial Port
Service RecHandle: 0x10000
Service Class ID List:
  UUID 128: 00001101-0000-1000-8000-00805f9b34fb
Protocol Descriptor List:
  "L2CAP" (0x0100)
  "RFCOMM" (0x0003)
    Channel: 1
Language Base Attr List:
  code_ISO639: 0x656e
  encoding:    0x6a
  base_offset: 0x100
Important informations are RFCOMM and Channel 1. RFCOMM is a serial port emulation protocol for radio transmission.
Now we can write to /etc/bluetooth/rfcomm.conf:
rfcomm0 {
	bind yes;
	device 00:07:80:91:30:09;
	channel	1;
	comment "Arduino BT";
}
Of course channel may have the same value as returned by sdptool. Having it written in the configuration file we are able to connect:
$ sudo rfcomm connect 0
Connected /dev/rfcomm0 to 00:07:80:91:30:09 on channel 1
Press CTRL-C for hangup
Now it remains to set minicom -s the port to /dev/rfcomm0 and we should be connected to Arduino serial.
In theory :) Arduino BT should be programmed with the following code (original without formatting) by deafult:
/* BT test 01
* ——————
* Massimo Banzi
*
*/
int LED = 13; // select the pin for the LED
int RESET = 7;
void setup() {
pinMode(LED,OUTPUT); // declare the LED’s pin as output
pinMode(RESET,OUTPUT); // declare the LED’s pin as output
Serial.begin(115200); // connect to the serial port
digitalWrite(RESET, HIGH);
delay(10);
digitalWrite(RESET, LOW);
delay(2000);
Serial.println(“SET BT PAGEMODE 3 2000 1”);
Serial.println(“SET BT NAME ARDUINOBT”);
Serial.println(“SET BT ROLE 0 f 7d00”);
Serial.println(“SET CONTROL ECHO 0”);
Serial.println(“SET BT AUTH * 12345”);
Serial.println(“SET CONTROL ESCAPE – 00 1”);
Serial.println(“SET CONTROL BAUD 115200,8n1”); //first release 19200
}
void loop () {
digitalWrite(LED, HIGH);
delay(100);
digitalWrite(LED, LOW);
Serial.println(“ciao”);
delay(1000);
}
It should – but from my humble experience, it usually comes from a factory with classic blink – digital pin 13 lights up and blows out. So it is in the code above, but it also should write “ciao” message on the serial. I haven’t yet succeeded to get the message with ‘fresh’ Arduino BT (at /dev/rfcomm0 there was silence all the time), however the 13th pin in fact was blinking (Arduino BT hasn’t LED diode on board, so you have to connect it).
It only remains to load the code above on the board. The best idea is to set BT in Arduino IDE permanently and add the following code to ~/.arduino/preferences.txt file:
serial.stopbits=1
serial.databits=8
serial.parity=N
serial.port=/dev/rfcomm0
serial.debug_rate=115200
serial.burn_rate=115200
board=bt
Now the program can be loaded without any problem. Note – even if Arduino tells it uses /dev/ttyS0 or USB0, with the abovementioned entry to preferences.txt it should be loaded through rfcomm0.
Loaded without any problem – but only when you know how. Well, the latest Arduinos equipped with USB have a firmware allowing to load new code at any time (the board is resetted through USB and new code is loaded). Arduino BT firmware doesn’t support this useful function, so we have to reset the module manually (S1 button) and press “Upload” in IDE in one second.
After such a procedure the program will be loaded easily and from now on minicom will show ciao.
Arduino BT is available on nettigo.pl – in small amounts, bigger are on request (maximum waiting time – a month).
Thanks for the info. I have a BT-V06 and it seems that resetting the board with S1 also resets the BT module – thus breaking the RFCOMM link and uploads fails with timeout.
I see others have the same problem, do you have any solutions for me.
Regards
Hans