Arduino – play!
A long silence on the blog is just broken! During the last few months I was strongly engaged in projects not connected with Arduino, whole time was absorbed by keeping the Arduino shields shop, servicing customers, searching for new suppliers, etc.
Now I have a bit time which I can spend by documenting experiments with Arduino, thus I hope to add some examples with Starter Kit soon.
Silence, go away!
As we have to break the silence, so więc let’s begin from controlling so called buzzer a tiny speaker able to produce not very loud sounds, with the Arduino. Let’s start from final product:
Arduino buzzer from Starter Kit on Vimeo.
Buzzer is controlled by Arduino, playing simple melody. Playing speed depend on reading from photoresistor (the more light, the slower it plays).
How it’s made?
I wrote, how to read values from photoresistor in one of previous posts. Buzzer is stimulated to play by properly applied high and low voltage. For (Arduino output port) safety a 220 Ohm resistor is added to lower the current passing through (from PDF with documentation appears that it’s not obligatory – at least 14 Ohm resistance should not generate current higher than 36 mA – lower than the limit value for Arduino I/O port – 40 mA).
Thankfully Arduino is open source and there are many ready to use elements. So, playing melody (note) issue is described in Melody tutorial. We will take advantage of it and add only part reading value from photoresistor and converting it to adequate delay.
The only modification of Melody tutorial (except from setup) is a line in loop:
tempo=analogRead(analog)/3+100;
It divides the voltage reading by 3 and adds 100. This way we will obtain value in range from 100 to 1023/3+100=441. Original tempo was delay 300. Only the schematic remains:
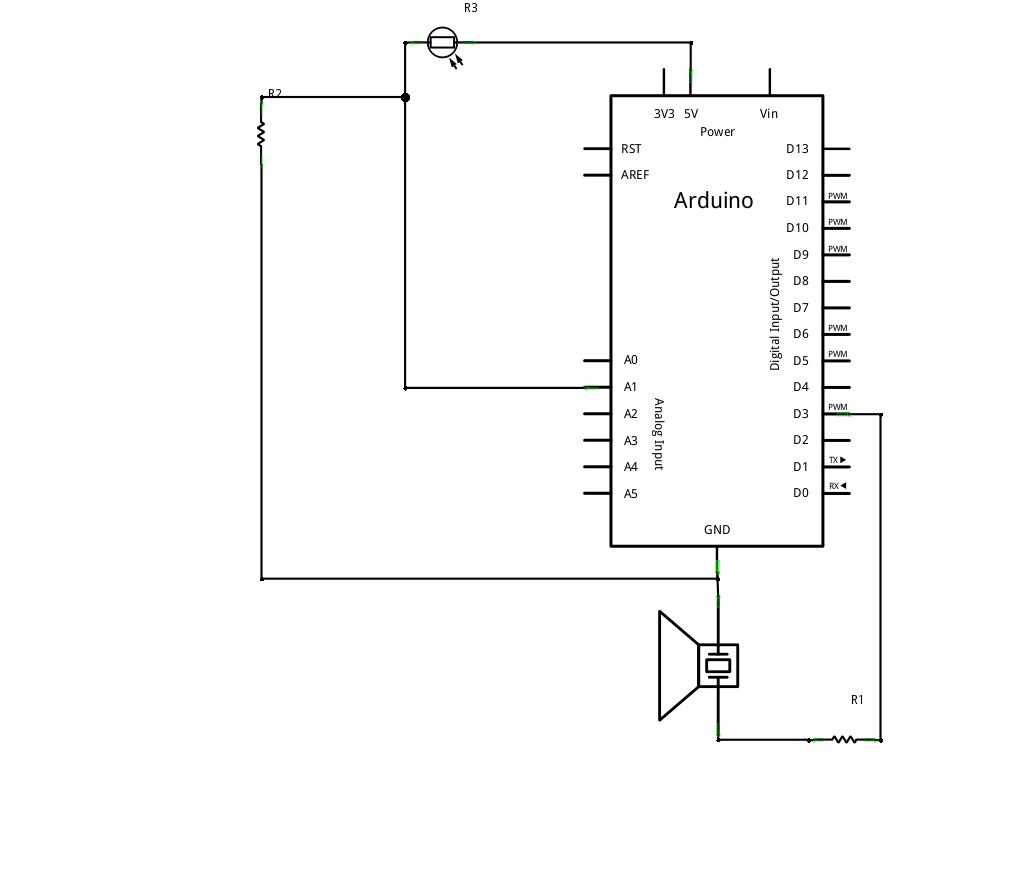
For beginners – a detailed description, how to connect the wires:
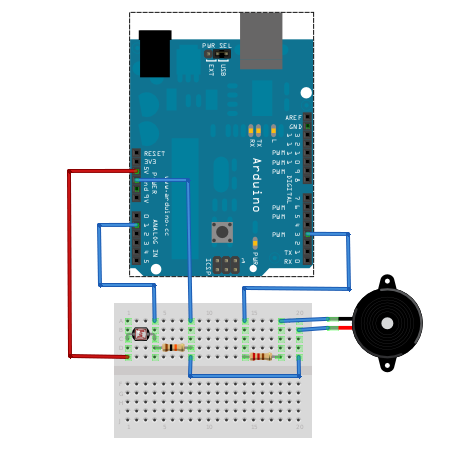
Detailed part list (Fritzing has only piezo buzzer in basic library, so it is used on the schematics):
Fritzing Bill of Materials

Sketch: 	buzzer.fz
Date: 	Tue Sep 29 01:11:59 2009

Arduino1      Arduino Diecimila
Breadboard1   Tiny Breadboard
J1            Piezo Speaker
R1            220 Ω Resistor
R2            10k Ω Resistor
R3            Basic Photo-Resistor (Photocell)

Shopping List

Quantity	Part

1		10k Ω Resistor
1		220 Ω Resistor
1		Arduino Diecimila
1		Basic Photo-Resistor (Photocell)
1		Piezo Speaker
1		Tiny Bre
And finally – the code used in example: melody.zip
PS
How do you like the diagrams and pictures designed in Frizting? For me, it’s perfect software for documenting experiments with Arduino. I reccommend – check it.
One thought on “Arduino – play!”