Sonar
If you visit this blog and you have an Arduino, you probably dreamed about building your own robot. The simplest perform easy commands (turn over, move). Things will become more complicated, if we want to build more standalone robot. The one, that would intelligently find a way to destination and avoid collisions. Sounds unreal? Of course! But there’s nothing difficult, it only requires some practice and…
…sensors.
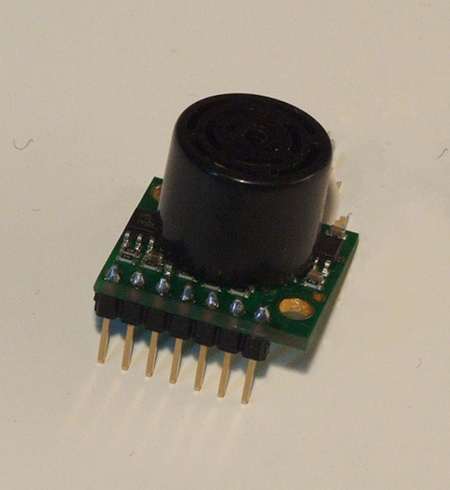
One of them is sonar, available in Nettigo. This sensor measures the distance to an obstacle using ultrasound (sound with a frequency about 42 kHz, what is greater than the upper limit of human hearing). Normally, this is used in alarm systems (unlike passive infrared systems there is possible to set the trigger distance) and in parking sensors. Installing it into your robot will let you know, how far are obstacles from the robot or make something like environment map.
Maximum distance detected by the sensor is 255 inches (6 meters) with 1 inch (2,54 cm) resolution. Soundwave beam width of “raw” sensor is about 24 inches (61 cm). The smallest distance sonar detects is 6 inches (15 cm).
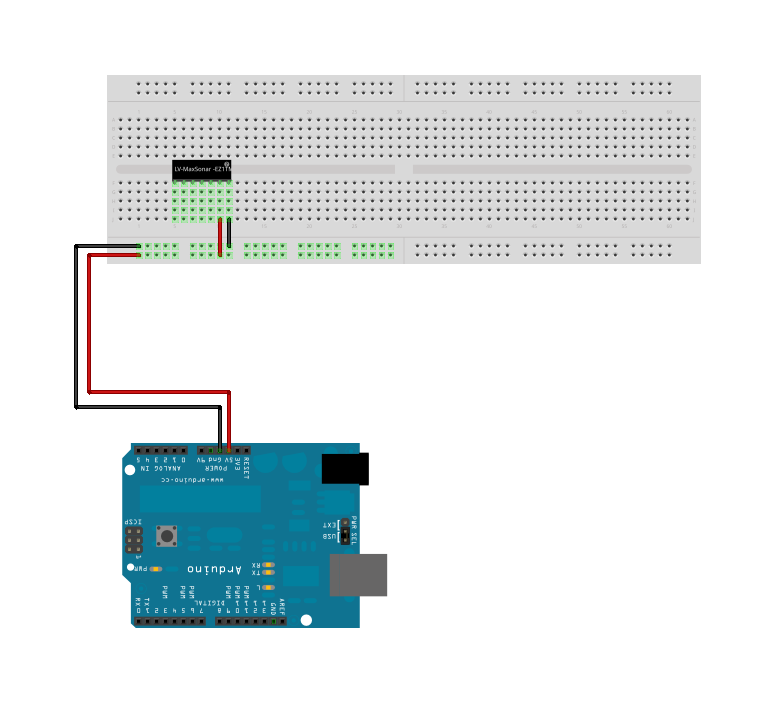
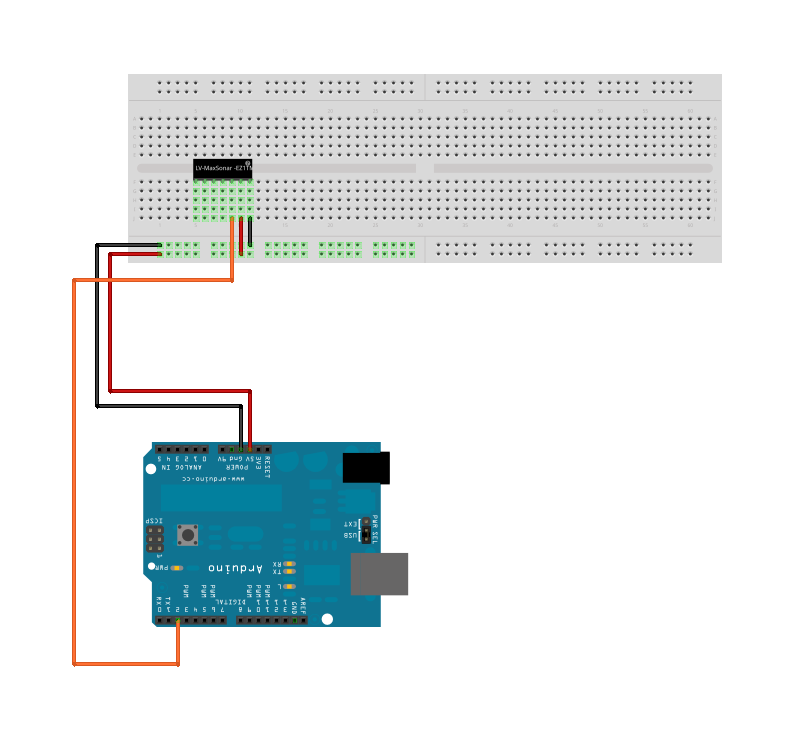
EZ1 sonar has quite a few terminals, but you shouldn’t be afraid of their amount. Most of them are for your convenience. The first two (GND and +5) are for powering the sensor. We connect them to their equivalents on Arduino.
The remaining terminals provide variety of signals representing detected distance.
Analog reading
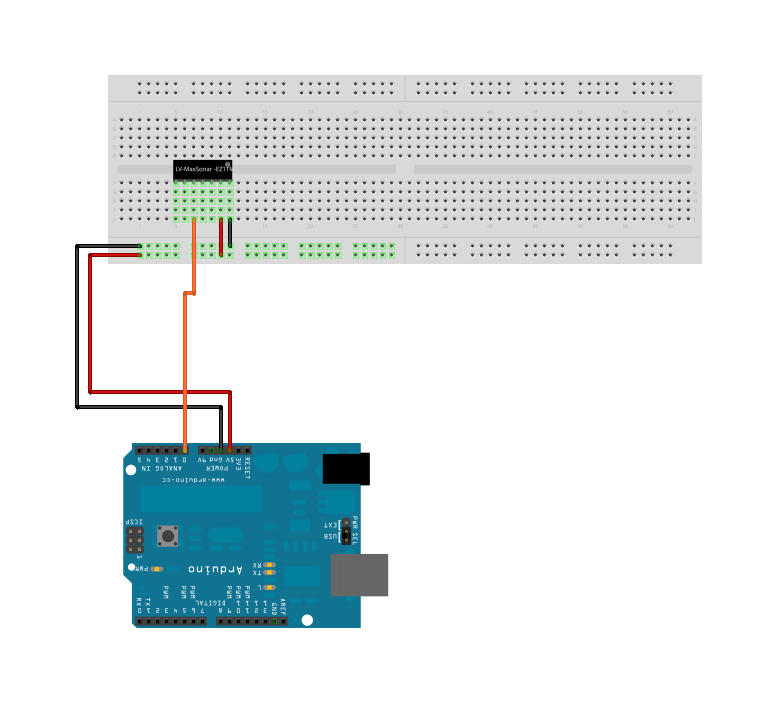
Analog distance signal is available in the sensor on pin marked as “AN”. We can connect this pin to one of Arduino’s analog inputs and read it with “analogRead” function.
Datasheet says, the voltage on “AN” increases by 9,8 mV with each inch of distance. As you know from previous posts, I reccomend manual compensation, which I will describe later.
Example function reading the distance from “AN” output may look as the following:
// Example of using LV-EZ1 analog output

// Analog pin to which you connected the sensor
#define SENSOR_PIN 0
// Compensation values
#define VALUE0 19
#define CM0 29
#define VALUE1 31
#define CM1 45

// Function returning distance to obstacle in cm
unsigned int get_distance()
{
  int data = analogRead(SENSOR_PIN);
  // return data // Delete the comment mark when calibrating
  return map(data, VALUE0, VALUE1, CM0, CM1);
}

void setup()
{
  Serial.begin(9600);
}

void loop()
{
  Serial.print(get_distance(), DEC);
  Serial.println(" cm");
  delay(100);
}
Impulse reading
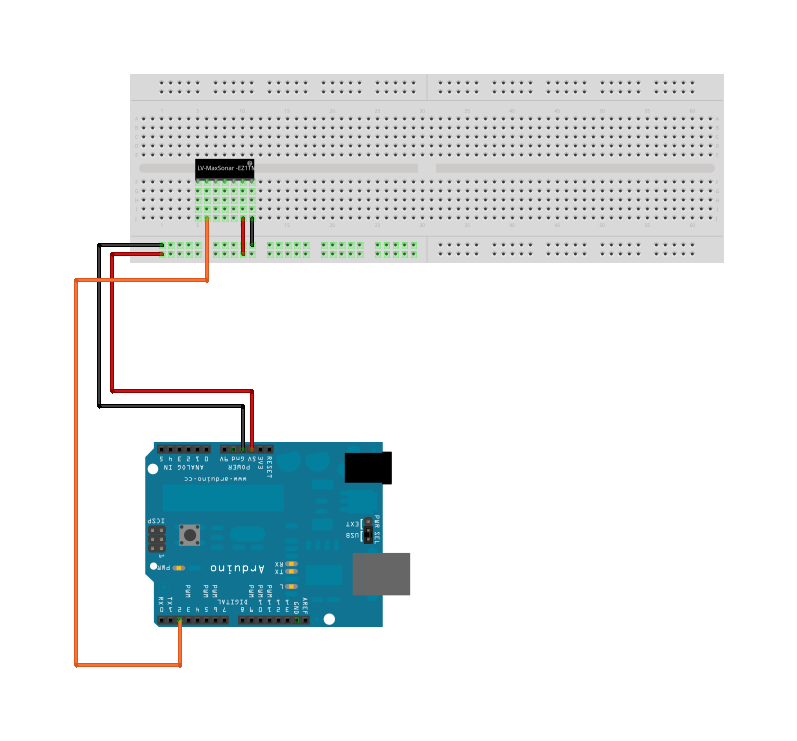
Another useful output of the sonar is pin marked as “PW”. This output uses so called PWM (Pulse Width Modulation). It means that width of “HIGH” impulse increases with distance. Arduino has a ready to use function for this occasion, called “pulseIn”. It’s first argument is number of Arduino’s digital pin, on which we measure the impulse width. The second argument is type of the impulse we measure – “HIGH”, or “LOW”. The function returns duration of the impulse in µs.
It also prevents our program from beginning the measurement in a wrong moment – it waits for the next impulse to begin.
// Example of using LV-EZ1 impulse output

// Digital pin, to which you connected the sensor
#define SENSOR_PIN 2
// Callibration values
#define VALUE0 1075
#define CM0 19
#define VALUE1 2150
#define CM1 39

// Function returning distance to an obstacle in cm
unsigned int get_distance()
{
  int data = pulseIn(SENSOR_PIN, HIGH);
  // return data // Delete the comment mark when calibrating
  return map(data, VALUE0, VALUE1, CM0, CM1);
}

void setup()
{
  Serial.begin(9600);
  pinMode(SENSOR_PIN, INPUT);
}

void loop()
{
  Serial.print(get_distance(), DEC);
  Serial.println(" cm");
  delay(100);
}
Datasheet says, that the width increases by 147 µs with each inch of distance.
Serial reading
The last data output of LV-EZ1 is the one marked as “TX”. It transmits digital, asynchronous data containing the distance. The data has the following format:
- speed: 9600 baud
- bit rate: 8
- no parity bit
- number of stop bits: 1
Asynchronous serial transmission
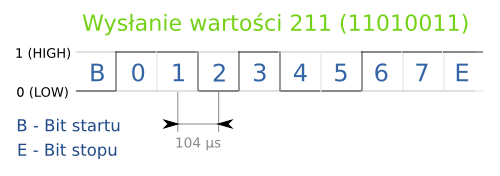
Involves sending information (numbers) with a single wire. The numbers are sended by bytes – 8-bit packets. Bits are sended one by one from the first to the last. Two additional bits are sended also. In the beginning – start bit, always 0 (LOW). It indicates beginning of the transmission. At the end – stop bit with 1 value (HIGH). It provides correct recognition of the end of the transmission.
If we aren’t sending anything, HIGH value is set to distinguish beginning of transmission from absence of transmission with start bit.
Asynchronous transmission lies in the fact that transmitting device doesn’t inform, when the transmission begins. It’s defined by calculating transmission speed – how many bits we are about to transmit in one second (including additional start and stop bits). Transmission speed unit is baud.
Assuming transmiting device sends data with 9600 baud rate, we can claim that next bit will appear every:
t = 1/f = 1/9600 = 0,000104167 s = 104,167 µs
Sonar’s serial signal would perfectly fit to the standard (digital pins 0 and 1 – Rx and Tx), if it wasn’t inverted. Inverted means, that its impulses are inverted. When the receiver expects logical 1 (HIGH value), it picks up logical 0 (LOW value).
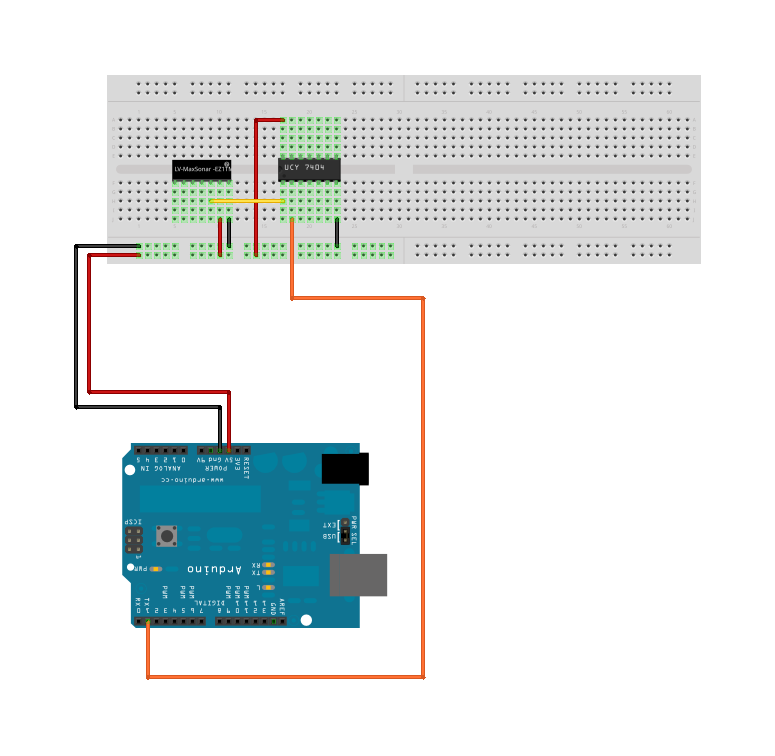
This signal we can observe with computer in “Serial Monitor” connected to Arduino IDE software, but we have to invert the signal. This can be done with “NOT” logic gates from irreplaceable “UCY 7404”. NOT gate has one input and one output. It gives on its output value opposite to this on input.
Second step is to remove processor from Arduino, as it excludes signal conflict between it and the sensor, which might cause errors.
You can connect everything according to this schematic:
After connecting to computer, “Serial Monitor” should quickly return a text:
R123[\r]
This is what exactly the sonar returns through serial port.
The first letter “R” is a header which indicates beginning of data packet to separate and recognize every distance. The next 3 characters represent distance in inches. The maximum distance is 255 inches. Last character is binary value 13, called “CR” in ASCII table or special character “\r” in C language.
More pins?
For handling serial port we can use yet another two sensor pins. The first is “RX”. Logic dictates it’s serial data input (by contrast to “TX” – output). But in the sensor using of this input is simplified. It serves to turning distance measurement on or off. The sensor measures distance and transmits it through “TX” when “RX” is unconnected or in HIGH state. When “RX” is in LOW state, the distance isn’t measured. The duration of HIGH state on “RX” input must be longer than 20 µs for correct measurement and data sending.
The last pin is “BW”. Setting it in HIGH state causes sending impulses corresponding to “0” binary value.
Serial reading in Arduino
Of course this output serves for using its data in Arduino, not in computer. We have two possibilities. If we won’t be using USB port in our project, we can connect “TX” output through “NOT” gate directly to pin 0 (“RX”) in Arduino (in Arduino Mega there are also two additional serial inputs, that could be used despite of using USB) and use “Serial” object in program. However, implementation of additional elements is inconvenient and complicated.
In Arduino software there is also “SoftwareSerial” library, allowing operating on serial data on any digital pin. But it doesn’t handle inverted signal. Thus, I let myself to expand it with extra “nread” method, which reads inverted signal.
int SoftwareSerial::nread()
{
  int val = 0;
  int bitDelay = _bitPeriod - clockCyclesToMicroseconds(50);

  // one byte of serial data (LSB first)
  // ...--\    /--\/--\/--\/--\/--\/--\/--\/--\/--...
  //     \--/\--/\--/\--/\--/\--/\--/\--/\--/
  //    start  0   1   2   3   4   5   6   7 stop

  while (!digitalRead(_receivePin));

  // confirm that this is a real start bit, not line noise
  if (digitalRead(_receivePin) != LOW) {
    // frame start indicated by a falling edge and low start bit
    // jump to the middle of the low start bit
    delayMicroseconds(bitDelay / 2 - clockCyclesToMicroseconds(50));

    // offset of the bit in the byte: from 0 (LSB) to 7 (MSB)
    for (int offset = 0; offset < 8; offset++) {
    // jump to middle of next bit
    delayMicroseconds(bitDelay);

    // read bit
    val |= (~digitalRead(_receivePin) & 1) << offset;
    }

    delayMicroseconds(_bitPeriod);

    return val;
  }

  return -1;
}
It will allow to read data from the sensor easily, without any additional elements.
// Example of using LV-EZ1 serial output

#include <SoftwareSerial.h>

// Digital pins, to whom you have connected the sensor
#define SENSOR_TX_PIN 2
#define SENSOR_RX_PIN 3

// Declaration of software serial communication object
SoftwareSerial sensor_serial = SoftwareSerial(SENSOR_TX_PIN, SENSOR_RX_PIN);

// Function returning distance in inches
int get_distance()
{
  char data[4] = "000";
  char header = ' ';
  // Waiting for appearance of data header ("R" letter)
  while (header != 'R')
    header = sensor_serial.nread();
  // Reading every digit of distance
  for (byte i = 0; i < 3; i++)
    data[i] = sensor_serial.nread();
  // Checking correctness of data packet ending ("\r" character)
  header = sensor_serial.nread();
  if (header != 13)
    return -1; // Value returned if data packet is corrupt
  return atoi(data); // Text string to int value conversion
}

void setup()
{
  Serial.begin(9600);
  pinMode(SENSOR_PIN, INPUT);
  pinMode(3, OUTPUT);
  digitalWrite(3, LOW);
  sensor_serial.begin(9600);
}

void loop()
{
  Serial.println(get_distance());
  delay(100);
}
Unfortunately “SoftwareSerial” has also certain weak points. The most important is that the function isn’t asynchronous. This means, that we have to wait fot the sensor to send data to us (“read” and “nread” methods are blocking whole program until the data is read). There’s no way to check (like with hardware port using “Serial.available” method), if any data is waiting for us.
Happily, there is one more library – “NewSoftSerial”, which is free of these defects and, in addidion, handles inverted serial signal.
// Example of using serial LV-EZ1 output

#include <NewSoftSerial.h>

// Digital pins, to whom you have connected the sensor
#define SENSOR_PIN_TX 2
#define SENSOR_PIN_RX 3

// Declaration of software serial communication object
NewSoftSerial sensor_serial(SENSOR_PIN, SENSOR_PIN_RX, true);

// Function returning distance in inches
int get_distance()
{
  char data[4] = "000";
  char header = ' ';
  // Waiting for appearance of data header ("R" letter)
  while (header != 'R')
    header = sensor_serial.read();
  // Waiting for 3 bytes of data to load to buffer
  while (sensor_serial.available() < 4);
  // Reading the digits of distance value
  for (byte i = 0; i < 3; i++)
    data[i] = sensor_serial.read();
  // Checking correctness of data packet ending ("\r" character)
  header = sensor_serial.read();
  if (header != 13)
    return -1; // Value returned if data packet is corrupt
  return atoi(data);
}

void setup()
{
  Serial.begin(9600);
  pinMode(SENSOR_PIN, INPUT);
  pinMode(3, OUTPUT);
  digitalWrite(3, LOW);
  sensor_serial.begin(9600);
}

void loop()
{
  int distance = 0;
  // Checking existence of data in buffer
  while (sensor_serial.available())
  {
    distance = get_distance();
    if (distance > 0) // Checking packet integrity
      Serial.println(distance, DEC);
  }
}
Callibration
The first two measurement methods (analog and impulse) require callibration (because of electrical resistances and delays in program). It needs to check what values are returned by distance calculation functions for certain distances, and after that, using previously described “map” function, convert them to our units.
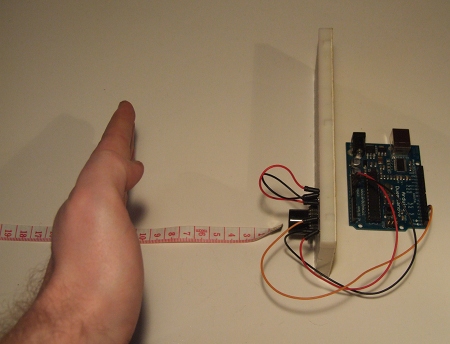
For callibration, there is tailor meter or long ruler needed. We direct the sensor sideways and place the ruler on its way. The edge of sensor’s casing should be aligned with zero point on ruler’s scale. Next, we put hand on the scale, in “field of view” of the sensor (farther than 15 cm).
After that, we move our hand even farther and write the values down.
Because the values are changing with every inch (2,5 cm), it’s better to place another obstacle in boundary points (where the value changes) to increase accuracy.
The wroted values should be placed in program’s code as definitions. “CM0” and “VALUE0” are the first distance and value returned from the function, “CM1” and “VALUE1” are the next.
My example values for analog input:
// Callibration values
#define VALUE0 19
#define CM0 29
#define VALUE1 31
#define CM1 45
and impulse:
// Callibration values
#define VALUE0 1075
#define CM0 19
#define VALUE1 2150
#define CM1 39
Radar
A good example of taking advantage of the sonar is “radar”. I mean, device which will make a map of obstacles in its surrounding. In your project, this could be useful to route planning (searching for ways, terrain orientation based on specific points).
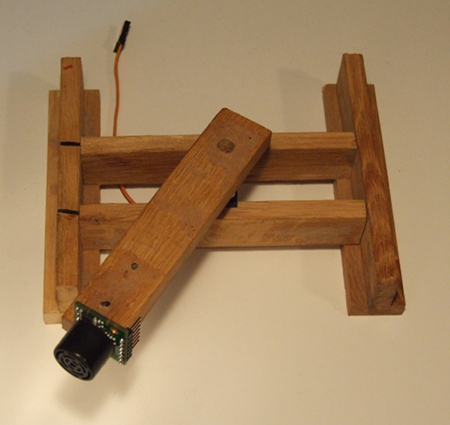
For turning the sensor I used a model servo.
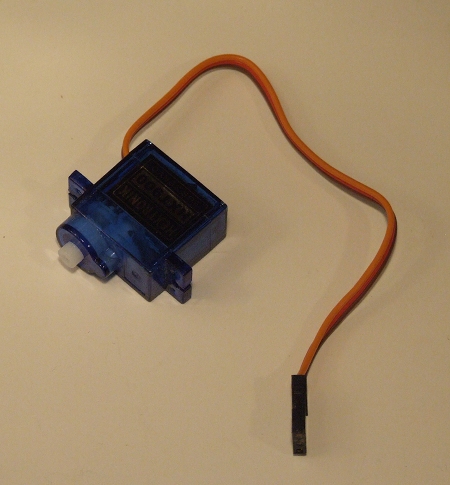
Servo is a device consisting of: motor, a few gearboxes and some electronics. This creates a quite strong drive (depending on type, about 1 kg on 1cm of the lever). The thing, that distinguish the servo from regular motor is ability to set a specific angle of its axis (from 0 to 180° range). This property is used in RC models to, for example, moving steers.
We have certainty, that by sending specific signal, the steer will be in desired position.
Servo usually has three wires.
- Brown – GND
- Red – Power supply (max. 6V)
- Yellow – controlling signal
Controlling the servo is easy.
It’s to provide controlling signal from any digital pin. Controlling signal are PWM impulses, whose width determines the angle servo’s axis should be turned. The standard is: 544 µs – 0°, 2400 µs – 180° angle.
There is another trick – the bigger is the break between two impulses, the slower servo turns to desired angle. The same rule affects how strong it works and holds position.
In Arduino project there are a few servo control libraries included. The built in one, Servo is good for basic operations, but has a certain disadvantage. It uses hardware timer of Arduino processor, which is also used by software time counter. With this library, you are unable to use such functions as “delay” and “millis”.
In the example program I let myself to exploit another library – SoftwareServo
It’s better than ordinary Servo, because doesn’t disturb other functions. Next disadvantage, which can also be advantage is neccesity to evoke “SoftwareServo::refresh()”, responsible for generating impulses, ever and again. The advantage is of course full control over strength and speed regulation (dependant on frequency of evoking it).
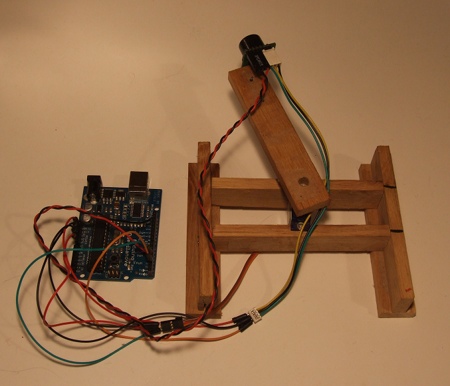
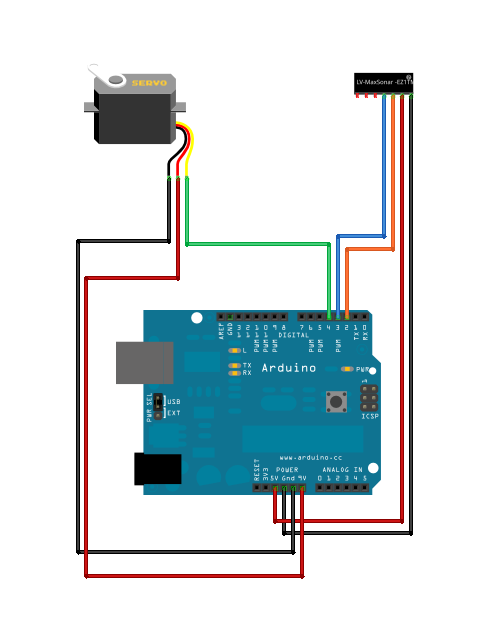
Radar’s electrical structure is based on connection from sensor’s serial output to digital pins (PIN2 – sensor TX, PIN3 – sensor RX). The controlling signal is wired to digital pin4. Power supply of the servo should be max. 6V. Thus, if we are powering Arduino with such a voltage or from USB port, it’s good to power the servo from “Vin” pin.
Communication with PC
For communication I used USB port, normally utilized for programming Arduino. This port is connected to serial input/output (pin 0 [RX], receiving data from USB, pin 1 [TX] – sending data to USB). For ths transmission abovementioned “Serial” object is responsible.
I decided to write similiar function, basing on this object.
It will be possible to send two commands:
- Rnnn\n – Chooses the angle to turn the sensor. Instead of “nnn” the angle in degrees (three digits, eg. 175, 032 or 005) should be written.
- D – In response for this command the distance to a obstacle will be returned. Format of this response is “Dnnn\r\n”, where “nnn” is distance in inches.
The way program works needs some explanation. “NewSoftSerial” library, like “Serial” object exerts asynchronous data loading using buffer. This means serial data is downloaded to special memory area, in which it waits for receiving. The amount of data in buffer could be monitored with “available” method. The program doesn’t clutter the buffer with outdated distance data. So, when you don’t download data with “D” command, the program automatically blocks data sending through pin3 (sensor RX) and cleans the buffer with “clean_buffer” function.
// Radar program for Arduino

#include
#include <NewSoftSerial.h>

// Digital pins, to whom you have connected the sensor
#define SENSOR_PIN_TX 2
#define SENSOR_PIN_RX 3

// Digital pin, to whom you have connected PWM controlling signal
#define SERVO_PIN 4

// Variable containing present sensor direction
int direction = 90;
// Variable telling if distance value was requested
byte read_distance = 0;

// Declaration of serial sensor communication object
NewSoftSerial sensor_serial(SENSOR_PIN_TX, SENSOR_PIN_RX, true);
// Declaration of servo controlling object
SoftwareServo sensor_servo;

// Function returning distance in inches
int get_distance()
{
  char data[4] = "000";
  char header = ' ';
  while (header != 'R')
    header = sensor_serial.read();
  while (sensor_serial.available() < 4);
  for (byte i = 0; i < 3; i++)
    data[i] = sensor_serial.read();
  header = sensor_serial.read();
  if (header != 13)
    return -1;
  return atoi(data);
}

// Function sending number in "nnn" (3-digit) format
void send_number(int number)
{
  if (number < 100)
    Serial.print("0");
  if (number < 10)
    Serial.print("0");
  Serial.print(number, DEC);
}

// Function sending distance data to the computer
void send_data(int distance)
{
  Serial.print("D");
  send_number(distance);
  Serial.println("");
}

// Function receiving commands from the computer
// Argument: timeout - time in [ms] after which the attempts to read data are stopped
int get_direction(unsigned long timeout=1000)
{
  char data[4] = "000";
  char header = ' ';
  // Present time storing
  unsigned long time = millis();
  // Header downloading
  header = Serial.read();
  // Checking, if it's distance request
  if (header == 'D')
  {
    read_distance = 1;
    return -4;
  }
  // Checking, if direction command header is present
  if (header != 'R')
    return -1; // If other, error code "-1" is returned
  // Waiting for 3 bytes of data to appear
  while (Serial.available() < 4)
  {
    // Checking, if the allowed waiting time is elapsed
    if ((millis() - time) > timeout)
      return -2; // In case if yes, "-2" error code returning
  }
  // Distance digits reading
  for (byte i = 0; i < 3; i++)
    data[i] = Serial.read();
  // Checking for proper data transmission ending
  header = Serial.read();
  if (header != '\n')
    return -3; // "-3" value means error
  return atoi(data);
}

// Function checks if rotation command was sent and executes it
void rotate()
{
  // Checking, if there are any data in the buffer
  while (Serial.available())
  {
    direction = get_direction();
    if (direction >= 0)
      // If the data was correct, setting servo angle
      sensor_servo.write(direction);
  }
}

// Clearing the software communication buffer
void clear_buffer()
{
  while (sensor_serial.available())
    sensor_serial.flush();
}

// Function returns distance, if it was requested
void distance()
{
  // Checking, if distance was requested
  if (read_distance == 1)
  {
    // Sensor activation
    digitalWrite(SENSOR_PIN_RX, HIGH);
    // 20 us for the sensor to distance measurement
    delayMicroseconds(20);
    // Waiting for data from sensor
    while (sensor_serial.available())
    {
      int distance = get_distance();
      if (distance > 0)
      {
        // If the sensor returned proper data, sending it to the computer
        send_data(distance);
        // Deleting distance request
        read_distance = 0;
        // Stopping the sensor
        digitalWrite(SENSOR_PIN_RX, LOW);
        // Buffer clearing
        clear_buffer();
      }
    }
  }
}

void setup()
{
  Serial.begin(9600);
  pinMode(SENSOR_PIN_TX, INPUT);
  pinMode(SENSOR_PIN_RX, OUTPUT);
  digitalWrite(SENSOR_PIN_RX, LOW);
  sensor_serial.begin(9600);
  // Servo callibration - minimum and maximum impulse length in µs
  sensor_servo.setMinimumPulse(560);
  sensor_servo.setMaximumPulse(2550);
  // Setting servo control pin
  sensor_servo.attach(SERVO_PIN);
  // Aligning the servo to the center
  sensor_servo.write(90);
  // Waiting for servo to align and turning the sensor on
  delay(1000);
  // Buffer cleaning
  clear_buffer();
}

void loop()
{
  rotate();
  distance();

  // Sending impulse to servo
  SoftwareServo::refresh();
  delay(10);
}
PC program
For data processing in the computer I used Python script language. Communication with Arduino is provided by “PySerial” module.
To prepare communication with Arduino “serial” module should be imported and “Serial” class object prepared.
Under my Linux it looks like this:
import serial
radar = serial.Serial('/dev/ttyUSB0', 9600, timeout=1)
The first argument is serial port device file. Its name complies with setting in Arduino IDE (menu “Tools > Serial Port”). Under Windows it will be “COMn”, where “n” is proper serial port number.
The next argument is time for “read” method to wait for data.
The result of this part is “radar” object, on which we perform read or write from assigned port operations.
To send a command turning the sensor to 180°:
radar.write('R180\n')
To read the distance we act like this:
radar.write('D')
distance = radar.read(6)
In “distance” variable” text string “Dnnn\r\n” containing the distance (in “nnn”) should appear.
Far more comfortable is receiving data with “readline”method. It reads data series until new line character (“\n” or “\r\n”) comes.
radar.write('D')
distance = radar.readline()
To convert this data into value in centimeters it could be written:
if distance[0] == 'D': # checking data header integrity
  distance = int(distance[1:4]) * 2.54 # convering part of the string to number and changing unit
As a result, in “distance” variable distance in centimeters appears.
Practical program
To attractive present radar idea I decided to write a program simulating its work. I used abovementioned Python language and its modules PyGTK, Cairo and Serial. To work in Ubuntu it needs only “python-serial” packet to be installed. Under Windows necessary exe/msi packets can also be collected: python, pygtk, pyserial.
#!/usr/bin/env python
#-*- coding:utf-8 -*-

# Radar control program
import math
import gtk
import cairo
import pangocairo
import gobject
import serial

# PNG pictures loading class
class Image(object):

    def __init__(self, filename):
        self.set_file(filename)

    def set_file(self, filename):
        self.surface = cairo.ImageSurface.create_from_png(filename)

    def draw(self, cr):
        cr.save()
        cr.set_source_surface(self.surface)
        cr.paint()
        cr.restore()

# Function rotating against coordinates
def rotatexy(x, y, angle, cr):
    rad = math.radians(angle)
    s = math.sin(rad)
    c = math.cos(rad)
    matrix = cairo.Matrix(c, s, -s, c, x-c*x+s*y, y-s*x-c*y)
    cr.transform(matrix)

# Arduino communication class
class Hardware(object):

    def __init__(self, port):
        self.serial = serial.Serial(port, 9600)

    def set_direction(self, direction):
        self.serial.write('R%03i\n' % direction)

    def get_distance(self):
        # Double distance reading due to sensor errors
        self.serial.write('D')
        data = self.serial.readline()
        self.serial.write('D')
        data = self.serial.readline()
        return int(data[1:4])

# GTK Widget depicting the radar
class Radar(gtk.DrawingArea):

    def __init__(self):
        gtk.DrawingArea.__init__(self)
        self.distances = [0] * 180
        self.angle = 0
        self.direction = True #True == Right

        self.background = Image('background.png')
        self.left_hand = Image('left_hand.png')
        self.right_hand = Image('right_hand.png')
        self.glass = Image('glass.png')

        self.connect("expose-event", self.expose)
        self.set_size_request(512, 256)

    def draw(self, cr):
        cr.set_source_rgb(0, 0, 0)
        cr.paint()

        self.background.draw(cr)

        cr.save()
        rotatexy(255, 255, self.angle, cr)
        if self.direction:
            self.right_hand.draw(cr)
        else:
            self.left_hand.draw(cr)
        cr.restore()

        cr.save()
        cr.set_source_rgba(0, 1, 0, 0.2)
        cr.set_line_width(2)
        cr.move_to(0, 0)
        cr.line_to(0, 255)
        for angle in xrange(180):
            if self.distances[angle] > 0:
                rad = math.radians(angle + 180)
                x = math.cos(rad) * self.distances[angle] + 255
                y = math.sin(rad) * self.distances[angle] + 255
                cr.line_to(x, y)
        cr.line_to(511, 255)
        cr.line_to(511, 0)
        cr.close_path()
        cr.fill_preserve()
        cr.set_source_rgb(0, 1, 0)
        cr.stroke()
        cr.restore()

        cr.save()
        cr.translate(0, 175)
        self.glass.draw(cr)
        cr.restore()

    def expose(self, widget, event, data=None):
        cr = self.window.cairo_create()
        cr = pangocairo.CairoContext(cr)
        self.draw(cr)
        return False

    def refresh(self):
        alloc = self.get_allocation()
        rect = gtk.gdk.Rectangle(0, 0, alloc.width, alloc.height)
        self.window.invalidate_rect(rect, True)
        self.window.process_updates(True)

    def set_distance(self, angle, distance):
        self.angle = angle
        self.distances[self.angle] = distance
        self.refresh()

# Controller - application class
class App(gtk.Window):

    def __init__(self):
        gtk.Window.__init__(self)

        self.angle = 90
        self.direction = 10

        self.hardware = Hardware('/dev/ttyUSB0') # Set proper port here

        self.radar = Radar()
        self.add(self.radar)

        self.connect('destroy', self.close)

        self.show_all()

        self.set_resizable(False)

        gobject.timeout_add(500, self.rotate)

        gtk.main()

    def distance(self):
        if self.direction > 0:
            self.radar.direction = True
        else:
            self.radar.direction = False
        distance = self.hardware.get_distance()
        self.radar.set_distance(self.angle, distance)
        return False

    def rotate(self):
        self.angle += self.direction
        if self.angle > 179:
            self.angle = 179
            self.direction = -10
        elif self.angle < 0:
            self.angle = 0
            self.direction = 10

        self.hardware.set_direction(self.angle)
        gobject.timeout_add(50, self.distance)
        return True

    def close(self, widget, data=None):
        gtk.main_quit()

if __name__ == '__main__':
    App()
Note!
For easier understanding the programs haven’t complex error handling procedures. However, such a handling could be easily added.
