Programming the Arduino Pro Mini with USB Mini
Everyone, who has been making a project based on Arduino probably wanted the board to be smaller than the basic unit.
A variety of smaller, but compatible with Arduino, boards have been developed. One of them is SparkFun’s Arduino Pro Mini. Currently, it has ATmega328 onboard and its dimensions are 33 mm x 18 mm. It’s available in two versions. The first runs on lowered (3,3V) supply voltage, sacrificing clock frequency (up to 8 MHz). The latter version is a copy of an ordinary Arduino – works with 5V supply and the maximum frequency is 16 MHz.
If the board is so small, then what’s lacking? So, there is no USB/Serial converter (however, it lowers the price also). Because of that we need an additional device for programming it – USB/Serial TTL converter.
One of USB/Serial converters in Nettigo’s offer is Arduino Mini USB. Wiring it up and programming could cause some problems, so, here is a small HOWTO:
Manual programming
After resetting the device, Arduino bootloader is active for about a second. It waits for data on Serial and, if some binary data is present – transmission will be stored in Flash memory and started. Therefore, the simplest way is to connect Arduino Mini USB and Pro Mini like the following:
- Connect USB Mini and Pro Mini grounds (GND z GND)
- Supply voltage from USB Mini (+5V) to Vcc on Pro Mini
- RX from USB Mini to RX1 on Pro Mini
- TX from USB Mini to TX0 on Pro Mini
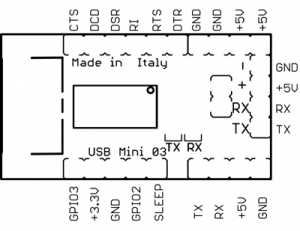
The outputs on USB Mini are unlabelled, so here is a pinout schematic (USB socket is at the left of this picture):

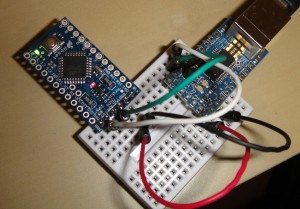
In practice, it looks like this:

A sketch needs to be compiled at first (the icon with a triangle) and compiled after that. In order to do it, press the reset button on Arduino Pro Mini and the upload button in Arduino IDE simultaneously (before that, choose the proper board in Tools/Board menu). TX i RX on USB Mini will start blinking and the sketch should be on Pro Mini after a while.
Automatic Reset or Software Reset
Since a long time ago, a regular Arduino can be easily programmed by clicking Upload in the IDE with no need for resetting it manually. In the case of Mini boards, often placed in difficult spots, this method is much better.
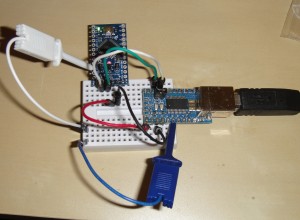
To accomplish it, we only have to connect USB Mini’s RTS output to any of RST inputs on Pro Mini:

I’ve used Bus Pirate probes here, because I hadn’t any pin headers soldered. From now on the programming only requires clicking Upload in Arduino IDE.
