Project: Using Arduino YUN to control things remotely
Arduino YUN is very interesting product. Mixing OpenWRT and Arduino in one board is effective. OpenWRT does things related to WiFi connectivity, Arduino YUN does interact with physical world, and standard Arduino library makes connecting both parts easy. Now we need some simple project to demonstrate how You can control things remotely with Arduino YUN

To demonstrate how easy You can build something using this components we will use Arduino YUN, connect to it with browser (can be in smartphone) and You control some LED using webpage. This project was shown on Robomaticon 2014 in Warsaw to make YUN more understandable. Robomaticon is event for robotics and electronics enthusiasts, so YUN was acting as open hot spot, anybody could connect to it and using http://1.1.1.1 control LEDs. Why numerical address instead of some more userfriendly name distributed via DHCP to clients? Not all phones were accepting .local domain extension, so since whole setup was not connected to Internet we used this easy to enter public address.
First things first – using documentation on arduino.cc configure YUN, remember make REST API open (w/o password). As I said before our setup was in closed environment and somebody hijacking control over LEDs can not make any harm. If You want to control real devices, You have to keep that in mind.
Our project is built from two parts: Web page and sketch for Arduino. Using Arduino IDE 1.5.x and having www subfolder in Your sketch directory makes uploading to YUN both Your sketch and HTML simple task. When uploading via WiFi (another nice YUN feature – wireless upload) sketch is uploaded to Atmega32u4 and www subfolder content is uploaded to /www/sd/<our sketch name>. This works only if You upload through WiFi, when using USB connection only sketch is being uploaded.
One important note – YUN has to be equipped with microSD card, this is a place where our HTML files are be kept. First time You are trying upload HTML files You can get Warning: Problem accessing board folder /www/sd. At begin there is no proper directory. Log onto YUN using SSH and issue command ln -s /mnt/sdcard /www/sd (You can check what is mounting point for SD card issuing command df after card is inserted into YUN (also when logged via SSH).
Arduino YUN: BRIDGE Library
Bridge is standard library for YUN, included with Arduino IDE (as for now YUN is being supported in 1.5.x line). This library makes communication between OpenWRT and Arduino very easy. REST API enabled in basic YUN configuration is bound to /arduino/ endpoint, so each HTTP request to http://arduino.yun.address/arduino/some_string are using Bridge library sent to Arduino. Everything after /arduino/ part is easy to read in our sketch. So let’s look at this simple HTML code (uses jQuery)
<script type="text/javascript">
 function ledon()
 {
 $('#content').load('/arduino/ledon');
 }
 function ledoff()
 {
 $('#content').load('/arduino/ledoff');
 }
</script>
Simple code above defines simple calls to URL begining with /arduino/. As it was said before, all remaining part of URL is easy accessible from Arduino sketch. So, /arduino/ledon is seen from sketch as just ledon. REST API provided out of the box provides simple access to all digitl and analog pins. So sending GET to http://myArduinoYun.local/arduino/digital/13/1 will set digital IO no 13 in HIGH state (it will light led on board). We want to show how to match actions to URLs. Frist we define server object:
YunServer server;
then in setup function we initialize server:
  Bridge.begin();
  server.listenOnLocalhost();
  server.begin();
using server.listenOnLocalhost(); is makes only Bridge server to listen on localhost only – this does not add any security to Your Arduino YUN REST API!
In loop we need to follow this setps:
- create new instance YunClient from YunServer
- if there is new connection – process it
  YunClient client = server.accept();

  if (client) {
    process(client);
    client.stop();
  }
process function we can just get command:
void process(YunClient client) {
  String command = client.readStringUntil('/');
And there is only one thing to do – just do what we want to do based on command:
if (command == "ledon") {
       digitalWrite(13, HIGH);
 }
else if (command == "ledoff") {
       digitalWrite(13, LOW);
}
This code does what REST API does out of the box, but has advantage it can be modified to perform more actions than bare REST API can do in one call. With sending command led5on and led5off we can turn all LED on/off:
if (command == "led5on") {
      digitalWrite(13, HIGH);
      digitalWrite(12, HIGH);
      digitalWrite(11, HIGH);
      digitalWrite(10, HIGH);
    }
    else if (command == "led5off") {
      digitalWrite(13, LOW);
      digitalWrite(12, LOW);
      digitalWrite(11, LOW);
      digitalWrite(10, LOW);
Ok, now we take our HTML code and sketch and upload to Arduino YUN via WiFi. If You point Your browser to http://arduino.local/sd/SKETCH_NAME You will see page:
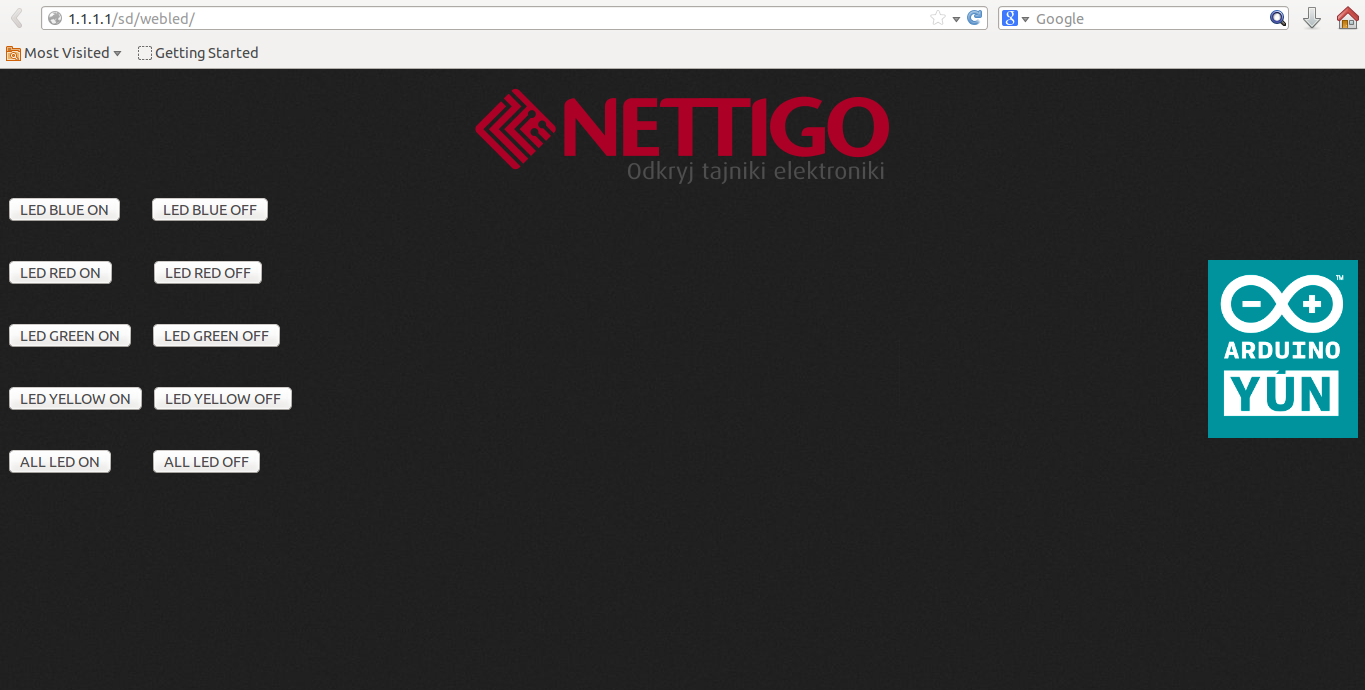
As You can see from URL our sketch is called webled, and we used 1.1.1.1 IP address for YUN (You can do that only when network is not connected to Internet – in such case You should stick to so called private networks like 10.0.0.0/8 or 192.168.0.0/16). All is working as expected, however there is a noticeable delay – it takes 2-3 seconds to light on/off LED after button is being clicked.
REDIRECT
As I mentioned earlier, project was meant to allow anybody to connect to YUN (which was acting as hot spot) and play with LEDs. This is why we used 1.1.1.1 (as You probably remember not all phones were able to use arduino.local shortcut), but there is ugly /sd/webled URL part – entering that on phone is not very handy. To skip that part we will make redirect from YUN home page to this control page.
We need to connect to YUN via SSH (standard program in UNIX environment, for Windows You can use Putty): -l root arduino.local, enter the same password You have setup on WWW interface and:
cd /www
ls
Before any changes to redirect keep in mind that currently when You access YUN home page, You are redirected to admin interface. When You change default redirect You will have to remember where You should point browser. As for today admin interface is under http://arduino.local/cgi-bin/luci
There should be file index.html, You have to edit it with vi index.html find URL in <meta> tag and replace it with Your own. This vi version (for first time users it will be strange feeling to use vi :) ) should allow You edit whole document after You press i key. When You are done press ESC then enter :wq and press Enter - this will save Your file and finish editing. In case You have messed and don't want to save enter :q! and press Enter to exit not saving any changes to file.
Now, examine URL we have entered – this is exactly URL we were using to get to our app:
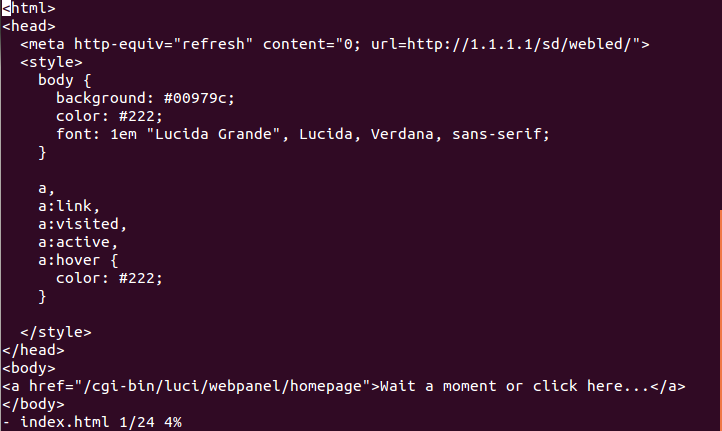
Now You can test it – access Your YUN and You should be redirected directly to LED controll page. Voila!
All data – HTML files, Arduino sketch are available on Google Drive
can you explain how to upload the www folder?? on the arduino YUN.
Everyone seems to skip this important step! why?
You say is easy to do that but in practice that is not quite the case; there is an error showing whilst uploading the arduino sketch .
Also, how do you upload the www folder ?
If you know it then please show it in steps otherwise STOP showing tutorials all-together.
thx
must have the SD card ? can i do this project without SDcard?
As far as I remember (I don’t have Yun to check it) You have to use SD card to get automatic WWW upload feature.
Any content from www catalog INSIDE of Your sketch folder will be uploaded (when uploading to Yun via WIFi) to /www/sd folder. If You create symlink and there is enough space for HTML in Yun flash,then it should work w/o SD card. Try to find out.
@Pellumb
It is explained in article:
If this is not clear, tell me what step is failing for You.
I don’t remember and don’t have YUN to test it right now, but in case there is no /www folder You can create it using mkdir /www
SD card has to be inserted into YUN and it has to be formated to FAT.
I am also having issues at this point.
I have created directories as:
/mnt/sda1/arduino/www/sd/
I have put the entire contents of the webled folder in the www directory.
I’ve attached a screenshot of what is going on here: http://imgur.com/4K57obo
I’ve even made copies of the www folder and put them in different hierarchies within the filesystem, and still no luck???
It is also telling me that the path exists???
http://imgur.com/nz1SANY
@Lance
Symlink created with
ln -sis permanent, so if You issue second time this command it will report path exists. So, to change symlink to point it to other location – first delete symlink withrm /www/sdand then create it again. From Your screenshots, it looks like naming of mount point has changed (article is 2 years old), so /mnt/sdcard is no longer accurate. Probablyln -s /mnt/sda1/arduino/www/sd /www/sdis what You need in Your project.Got It to work. Yeah I wasn’t uploading the sketch correctly. But anyway, point taken. Thanks for the fast response.
I have all files now in the correct places. But I am now having issues with making the new bridge sketch as mentioned in your walkthrough, after the part about adding the javascript. I am assuming I just compile it all into one sketch so that it looks similar to this: ( I am using Bridge in place YUN)
#include
#include
#include
BridgeServer server;
void setup() {
Bridge.begin();
server.listenOnLocalhost();
server.begin();
}
void loop() {
BridgeClient client = server.accept();
void process(BridgeClient client){
String command = client.readStringUntil(‘/’);}
if (client) {
process(client);
client.stop();
}
if (command == “ledon”) {
digitalWrite(13, HIGH);
}
else if (command == “ledoff”) {
digitalWrite(13, LOW);
}
if (command == “led5on”) {
digitalWrite(13, HIGH);
digitalWrite(12, HIGH);
digitalWrite(11, HIGH);
digitalWrite(10, HIGH);
}
else if (command == “led5off”) {
digitalWrite(13, LOW);
digitalWrite(12, LOW);
digitalWrite(11, LOW);
digitalWrite(10, LOW);
}
I will buy you a coffee for your time :)
Is there any way to prevents delay on commands? Openning a led in 2-3 sec is not good. I tried without web browers it takes 1-1,5 secs to respond. Why ? any idea to do it instantly?
@Cem
I dont think it is possible to remove latency, at least using default tools. On linux side is web server, python script, shell pipe. Since there is not a lot ‘horsepower’ it will take time.
I guess You could write own software, doing this (listening on web requests and sending it them directly to ATmega) and it could be faster. Solution provided by Bridge and related tools are meant to be versatile and easy to use, not to be super efficient.